
This guide walks you through decorating your home for a spooky Halloween, from planning a theme and choosing a color scheme to staging indoor scenes, dressing up your exterior, and adding lighting and sound that make the whole display feel haunted. By the end, you will have a decorated entryway, living areas, and yard or porch that read as deliberately spooky rather than randomly cluttered — and everything will be safe for guests, trick-or-treaters, and pets.

Get furniture and decor delivered free — and shop member deals
- Fast, free delivery on millions of items
- Access to Prime Big Deal Days deals on October 6–7
- Prime Video, Amazon Music and more included

DIASY 120 Pcs 3D Bat Wall Decor Stickers for Halloween Home Decoration
- ✔ Quantity: 120 pieces
- ✔ Sizes: 20 large (16 x 4 cm), 20 medium (12 x 3 cm), 20 small (8 x 4 cm), 60 mini (9 x 2 cm)
- ✔ Material: Waterproof PVC

Floating LED Candles with Remote Control, 12-Piece Set – Magic Witch Wizard Themed Halloween & Christmas Decoration
- ✔ Quantity: 12 candles
- ✔ Included Accessories: 12 hooks, 164FT fishing line, 1 remote control
- ✔ Batteries Required: 2 AA per candle (not included)
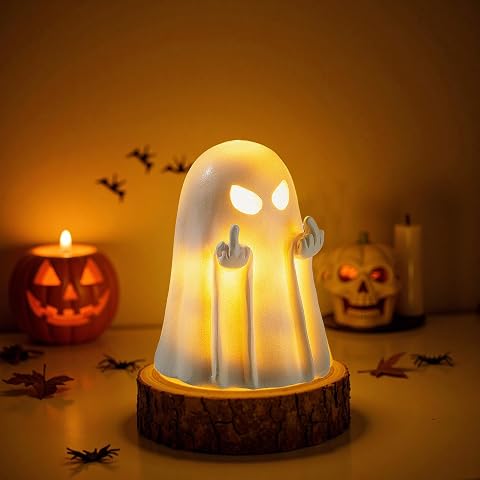
Halloween Ghost Figurine – Cute Spooky Resin Statue for Home, Party, Indoor & Porch Decor
- ✔ Material: Resin
- ✔ Dimensions: 3.4" x 2.3"
- ✔ Craftsmanship: Handmade
This guide is written for beginners. No crafting expertise is required; most steps use store-bought props, basic tools, and items you likely already own. Expect to spend 3 to 5 hours total, plus shopping time. You can complete the project in one weekend or split it across several evenings. A modest budget of $50 to $150 covers a strong display, though you can spend less by relying on DIY elements and repurposed household items.
Difficulty: Beginner | Time: 3-5 hours (spread over a weekend)
What You’ll Need
Tools & Materials:
- Scissors and a utility knife
- Hot glue gun and glue sticks
- Zip ties, fishing line, and painter’s tape
- Staple gun or outdoor-rated adhesive hooks
- Extension cords rated for outdoor use (if decorating outside)
- Timer or smart plug for lights
- Black trash bags and cheese cloth for DIY props
- Ladder or step stool for elevated placements
Knowledge:
- Basic home safety practices for electrical cords and candles
- Ability to hang lightweight items without damaging walls
- Familiarity with your home’s outlet locations and circuit limits
Inventory what you already own before buying anything. Old sheets, broken dolls, glass jars, and string lights from previous holidays can cover half your display at no cost. Check weather forecasts if you plan outdoor decor — paper and lightweight fabric props need sheltered placement or anchoring.
DIASY 120 Pcs 3D Bat Wall Decor Stickers for Halloween Home Decoration
When it comes to transforming an entire room, nothing else in this lineup comes close. The DIYASY set gives you 120 waterproof PVC bats across four sizes, which means you can create a natural-looking swarm that appears to erupt from a corner and scatter across the wall. Compared with the floating candles, which light a single area, the bats claim your whole visual field — guests see them the moment they walk in.The 3D effect is what separates these from cheap flat decals. Each bat arrives flat, but you bend the wings into different angles before applying, so the swarm casts subtle shadows and looks like it’s mid-flight. It’s a small assembly step, but it’s also what makes the project fun to do with kids — more hands-on than hanging candles, less delicate than unboxing a resin figurine.The tradeoffs are real, though. Adhesion demands smooth, clean, dry surfaces; a dusty textured wall will shed bats by Halloween night, so wipe down surfaces first. Removal requires a hair dryer’s heat rather than a simple peel, which protects your paint but adds a step at season’s end. Still, for indoor-outdoor flexibility and sheer scale, this is the pick we’d recommend first.
Pros:
- 120 bats in 4 sizes let you build layered, natural-looking swarms
- Waterproof PVC works indoors and outdoors
- Bendable wings create a genuine 3D fluttering effect
- Heat-assisted removal protects paint and surfaces
Cons:
- Surfaces must be cleaned and smooth or bats won’t stick
- Wings need manual bending before application — a time investment for 120 pieces
- Not suited to textured or dusty walls
Best for: Households wanting maximum dramatic impact across multiple walls or a front porch, especially families decorating together
Not ideal for: Renters with heavily textured walls, or anyone wanting zero setup effort
Bottom line: The most transformative decor dollar you can spend this Halloween — ideal if you’re willing to prep surfaces and bend a few dozen wings.
“The most transformative decor dollar you can spend this Halloween — ideal if you’re willing to prep surfaces and bend a few dozen wings.”
Floating LED Candles with Remote Control, 12-Piece Set – Magic Witch Wizard Themed Halloween & Christmas Decoration
If the bats are the visual centerpiece, these floating candles are the mood-setters. Hung from nearly invisible fishing line, the 12 LED pillars appear to hover in midair with a realistic flickering flame effect — the classic wizard’s-hall look, achieved without a single open flame. Compared with the ghost figurine, which decorates one shelf, this set changes how an entire room feels after dark.We appreciate that this is a complete kit: 12 hooks and 164 feet of fishing line are included, so you’re not scavenging hardware mid-project. The remote control is a genuinely useful touch — dimming or switching off a ceiling-height display without a ladder is exactly the convenience you’d miss if it weren’t there. Battery life is the quiet strength here: LEDs sip power, so one set of batteries can last the whole season.The drawbacks are twofold. First, you’ll need to supply 24 AA batteries yourself, which is a meaningful added cost worth budgeting for. Second, there’s no water resistance at all — unlike the bat stickers, which can fly outdoors, these candles are strictly indoor decor. Hang them on a covered porch at your own risk.
Pros:
- Realistic flicker effect with zero fire hazard or wax mess
- Complete hanging kit included — hooks plus 164FT of fishing line
- Remote control operation for hard-to-reach ceiling displays
- Months of illumination per set of batteries
Cons:
- 24 AA batteries required, sold separately
- Not water resistant — indoor use only
- Hanging 12 candles takes planning and ladder time
Best for: Anyone creating a haunted manor or witchy ambiance indoors, especially homes with kids or pets where real candles aren’t an option
Not ideal for: Outdoor displays, or buyers unwilling to purchase batteries separately
Bottom line: The best pick for atmosphere and safety — just budget for batteries and keep the display inside.
“The best pick for atmosphere and safety — just budget for batteries and keep the display inside.”
Halloween Ghost Figurine – Cute Spooky Resin Statue for Home, Party, Indoor & Porch Decor
Not every Halloween display needs to fill a wall or light a room. This handmade resin ghost is the detail-oriented pick: at 3.4 x 2.3 inches, it slots onto a mantel, office desk, bookshelf, or dining table where the other two options simply can’t go. Where the bats overwhelm and the candles dominate, this little ghost charms from the sidelines.Its design leans cute-spooky rather than genuinely frightening, which is a feature or a bug depending on your audience. Compared with the other picks, it’s the only one that works as a gift — a coworker, teacher, or Halloween-obsessed friend would genuinely enjoy receiving it. The handmade resin construction gives it a handcrafted feel that mass-produced decals and LED candles can’t replicate, and it doubles as a party-table centerpiece or haunted-house vignette prop.The limitations follow directly from its strengths. That compact size disappears in a large outdoor display — it’s no substitute for a porch-sized prop. And resin is fragile; unlike waterproof PVC bats, one drop onto a hard floor could crack it, so households with very young children should place it up high. As a finishing touch rather than a focal point, though, it earns its place.
Pros:
- Cute, whimsical design that softens spooky themes for all ages
- Compact size fits mantels, desks, shelves, and tabletops
- Handmade resin construction with a crafted, giftable feel
- Versatile as party decor, shelf accent, or gift
Cons:
- Too small for large outdoor displays
- Fragile resin requires careful handling and placement
Best for: Desk decorators, gift-givers, and anyone adding a finishing accent to an established Halloween display
Not ideal for: Buyers seeking large outdoor impact or households prone to knocking things over
Bottom line: The perfect finishing touch — a charming little ghost that completes a display rather than carrying it.
“The perfect finishing touch — a charming little ghost that completes a display rather than carrying it.”
As an Amazon Associate we earn from qualifying purchases.
Before You Start
Choose one spooky theme and commit to it before you buy or place anything. Mixed themes (cute pumpkins beside gore props beside retro monsters) are the most common reason Halloween decor looks messy instead of spooky. Strong beginner themes include: abandoned Victorian house (cobwebs, candelabras, dark fabric, portraits), witch’s lair (jars, bottles, dried herbs, spell books), graveyard (tombstones, fog, ground-level lighting), and haunted forest (branches, silhouettes, owls, dim green or amber light).
Pick a color palette to match: purple and green for a supernatural look, amber and orange for classic Halloween, or monochrome with deep red accents for horror. Every purchase decision should pass one test: does it fit the theme and palette?
Safety first: never leave open flames unattended, keep walkways and stairs clear of cords and props, and verify that every outdoor electrical item is rated for outdoor use. If children or pets visit your home, avoid small props that can be swallowed and secure anything a dog could pull down.
Step-by-Step Instructions
Step 1: Map your display zones on paper
Walk through and around your home with a notepad and mark four to six zones where decor will have the most impact: the front door or porch, the entryway inside, the main living room wall or mantel, one window facing the street, and optionally the yard or walkway. Write down what goes in each zone — for example, ‘porch: two tombstones, one strobe light, cobwebs on the railing’ and ‘mantel: black candlesticks, three jars, one skull.’ This map becomes your shopping list and prevents overbuying.
Tip: Prioritize the zones visible from the street and the front door. Guests and trick-or-treaters only see a fraction of your home, so spend your budget there first.
Check: You have a written zone map listing specific props for each area, and every item fits your chosen theme and palette.
Step 2: Stage the front entrance and porch
Start with the front door because it anchors the entire display. Hang a wreath or draped dark fabric on the door, stretch cotton cobwebs across the door frame and porch railing, and position your two or three largest props flanking the entrance — tombstones, a standing skeleton, or stacked pumpkins. Angle props slightly toward the walkway so they face approaching visitors. Add one lighting element here, such as a flickering lantern or uplight aimed at the door, so the scene is visible after dark.
Tip: Stretch cobwebs thin. Thick wads of cotton look like laundry; pulled-taut strands with uneven gaps look authentically haunted.
Check: Standing at the sidewalk, you can see a clear decorated focal point at your door, and at least one light source makes it visible at night.
Step 3: Dress the windows for street visibility
Place battery-powered candles or a small string of lights on the sill of your street-facing window, then add silhouettes: cut bat, cat, or witch shapes from black cardstock and tape them inside the glass, or position a single prop like a mannequin or skeleton so its shadow falls against the curtain when backlit. Turn the window lights on at dusk to check the effect from outside.
Tip: Silhouettes read best when the window behind them glows but the room itself stays dark. Close other lights in that room during evening viewing.
Check: From the street at night, silhouettes or lit props are clearly visible in the window without interior clutter distracting from them.
Step 4: Build the indoor focal scene
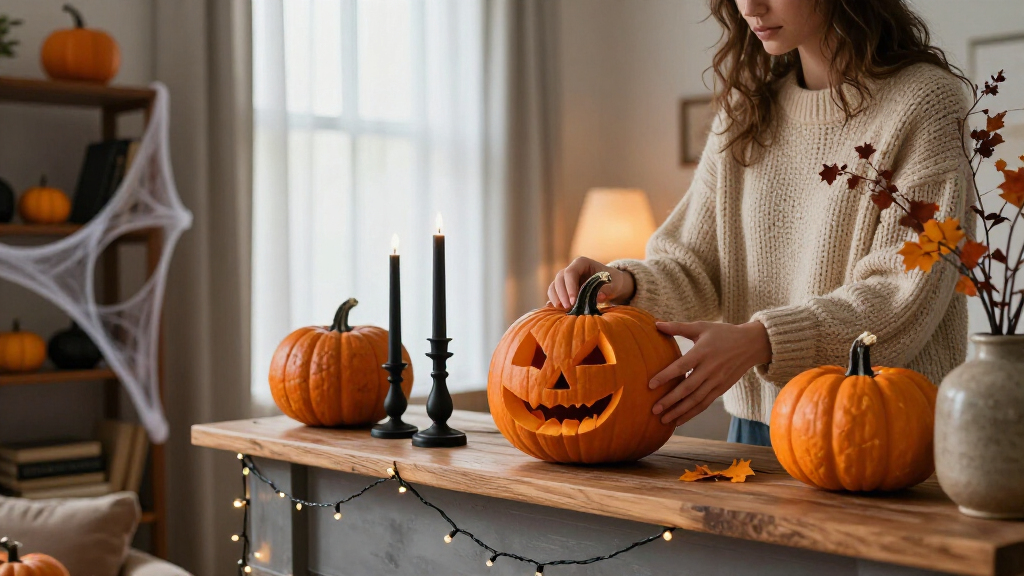
Choose one surface indoors as your main scene — usually the mantel, a console table, or a bookshelf — and arrange props in three layers: tall items at the back (candlesticks, branches, a framed ‘creepy portrait’), medium items in the middle (jars, skulls, small pumpkins), and small items at the front (spiders, keys, bones). Cluster items in odd-numbered groups of three or five rather than spacing them evenly. Drape a length of cheesecloth or dark fabric under everything to unify the scene.
Tip: Make creepy portraits by printing vintage-style faces from free image sources, tinting them slightly green or gray, and placing them in old frames. It is the highest-impact DIY prop for the effort involved.
Check: The scene has visible depth (back, middle, front layers) and looks composed rather than scattered when you view it from across the room.
Step 5: Add lighting as the final layer
Install your lighting after all props are placed, because light placement depends on the objects. Use uplights at the base of large props to cast dramatic shadows, flickering amber bulbs in lamps to replace normal lighting, and a low fog machine or colored floodlight on the porch for outdoor atmosphere. Connect indoor and outdoor lights to a timer or smart plug set to turn on at dusk and off at bedtime.
Tip: Dim or eliminate overhead lighting entirely. Spooky atmosphere comes from low, uneven, colored light — never from bright even light.
Check: At night, your display is lit entirely by decorative light sources, shadows fall in interesting directions on your props, and the timer switches everything on and off automatically.
Step 6: Scatter finishing details and do a safety pass
Add small touches in transitional spaces: spiders climbing a lamp cord, a rubber rat near the baseboard, cobwebs in an upper corner, a ‘Keep Out’ sign on a closet or basement door. Then walk the full path a visitor would take — sidewalk to door, then inside — and fix any hazards: tape down cords, remove trip-risk props from stair edges, replace any real candle near fabric with a flameless version, and confirm outdoor cords are plugged into a GFCI outlet.
Tip: Do this safety walk after dark with the lights on. Hazards hide in shadows during daytime checks.
Check: A full visitor path is clear of trip and fire hazards, every flame near fabric is flameless, and the small details reward a second look in each room.
Common Mistakes to Avoid
- Buying props before choosing a theme, resulting in a mismatched display. — Lock in one theme and color palette first, and reject any purchase that does not fit both. Bring your zone map when shopping.
- Distributing props evenly around rooms, which reads as clutter instead of staging. — Concentrate decor in the mapped zones and cluster props in odd-numbered groups with layered heights. Empty space between scenes makes the decorated areas stronger.
- Using indoor-rated lights and cords outside, creating a shock or fire risk in rain. — Check every item’s packaging for an outdoor rating, keep connections off the ground, and plug outdoor displays into GFCI-protected outlets.
- Over-lighting the display with bright white or overhead lights, which destroys the spooky mood. — Rely on low-wattage colored and flickering sources only, and test the full display from the street after dark before finalizing.
Troubleshooting
Problem: Outdoor props keep falling over or blowing away in wind.
Solution: Anchor tombstones and standing props with garden stakes or zip ties to hidden weights like bricks or rebar. Move lightweight fabric and paper items to sheltered spots and take them in on windy nights.
Problem: Cobwebs look fake or clumpy.
Solution: Use far less cotton than you think you need. Stretch a small piece between two anchor points until it is nearly transparent, and attach the ends with clear tape or hooks so the strands stay taut.
Problem: The display looks great up close but invisible from the street at night.
Solution: Add one bright focal light aimed at your front door or a large prop, and backlit silhouettes in a street-facing window. Silhouette and shadow effects carry much farther than small props.
Problem: Fog from a fog machine dissipates before it reaches the ground.
Solution: Cool the fog by running it through a short length of flexible duct or a container with ice packs before it exits. Cold fog hugs the ground and drifts across the walkway.
What Success Looks Like
Your Halloween decor is complete when all of the following are true: a visitor approaching at night immediately sees a clear, lit focal point at your front door; your street-facing window shows silhouettes or lit props; one indoor scene is fully staged with layered heights and themed props; all lighting runs on low, colored, or flickering sources and switches on automatically at dusk; and the full visitor path — sidewalk, steps, doorway, and indoor walkways — is free of cords, trip hazards, and unattended open flames. A final test: walk the route yourself after dark carrying a treat bag, exactly as a trick-or-treater would. If you can move safely and the scene still feels spooky from that angle, you are done.
Next Steps
Once the base display is up, layer in motion and sound on weekends leading up to Halloween: a motion-activated prop near the walkway, a hidden speaker playing low ambient sound, or a projected animation in a window. Photograph your finished display now so you can rebuild it faster next year. After Halloween, take everything down before rain or frost damages fabric and electronics, and store props by zone in labeled bins — next year’s setup will take half the time. If you want to expand, add one new zone each season rather than redoing the whole display at once.
Frequently Asked Questions
How far in advance should I put up my Halloween decorations?
Put up outdoor decor one to two weeks before Halloween and indoor decor up to a month early if you enjoy it. Fabric and paper props degrade in weather, so avoid leaving outdoor displays up for more than a month.
How can I make my display spooky on a very small budget?
Lean on free and near-free effects: stretched cotton cobwebs, black cardstock silhouettes in windows, DIY creepy portraits in thrifted frames, trash-bag bats, and dimmed amber lighting. A single colored floodlight, often under $10, transforms more than a cart full of small props.
Are real candles safe to use in Halloween decor?
Only with constant supervision and at least a foot of clearance from any fabric, cobwebs, or paper. Flameless LED candles in brass or black holders produce the same flicker with none of the risk and can run on timers overnight.
How do I keep my spooky decor from scaring very young trick-or-treaters?
Create a ‘treat zone’ at the sidewalk with a friendly sign and a lit, uncluttered path to the door, and keep gore props and jump-scare motion sensors set back from the walkway. Aim the scariest elements at adult eye level, not toddler level.
What is the single most effective upgrade for a spooky atmosphere?
Lighting. Replacing normal bulbs with flickering amber or deep purple ones, and adding one uplight behind a large prop, changes the entire feel of a room or porch for under $20 — more than any additional prop purchase.
Fall Picks
fall essentials
As an affiliate, we earn on qualifying purchases.